

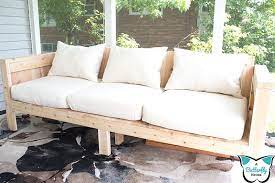
Looking to add some extra comfort to your outdoor seating? Look no further!
In this article, we’ll show you how to create your own DIY outdoor cushions. From choosing the right materials to adding finishing touches, we’ve got you covered.
With a few simple steps, you’ll have comfortable and stylish cushions that will transform your outdoor space into a cozy oasis.
So grab your materials and let’s get started!
Choosing the Right Materials
When choosing the right materials for your DIY outdoor cushions, it’s important to consider durability, weather resistance, and comfort.
Opt for fabrics that are specifically designed for outdoor use, such as Sunbrella or outdoor upholstery fabric. These materials are known for their durability and resistance to fading, mold, and mildew.
Additionally, choose foam inserts that are specifically made for outdoor use, as they’re designed to withstand moisture and retain their shape over time. Look for cushions with a high density foam core for added comfort and support.
Another important factor to consider is the presence of a water-resistant or waterproof barrier layer, which can help protect the cushion from the elements.
Measuring and Cutting the Fabric
To ensure the proper fit for your DIY outdoor cushions, you’ll need to accurately measure and cut the fabric, which will be discussed in this section.
Start by measuring the dimensions of your cushion foam or existing cushion. Use a measuring tape to measure the length, width, and thickness of the cushion. Add an extra inch to each measurement to allow for seam allowance.
Once you have your measurements, transfer them onto the fabric using a fabric marker or chalk. Make sure to double-check your measurements before cutting the fabric.
Use sharp fabric scissors to cut along the marked lines. Take your time and cut slowly to ensure clean and precise edges.
Remember to cut two pieces of fabric for each cushion – one for the top and one for the bottom.
Sewing the Cushion Covers
Sew the cushion covers using a sewing machine for a secure and professional finish.
Place the fabric pieces with right sides together and align the edges.
Pin them in place to prevent shifting during sewing.
Set the sewing machine to a straight stitch and adjust the stitch length as desired.
Begin sewing along one edge, backstitching at the beginning and end to secure the stitches.
Continue sewing around the edges, removing the pins as you go.
When you reach a corner, lift the presser foot and pivot the fabric to sew the next side.
After sewing all the way around, backstitch again to secure the stitches.
Trim any loose threads and turn the cover right side out.
Your cushion cover is now ready to be filled and enjoyed!
Adding Zippers or Velcro Closures
To create a secure closure for your DIY outdoor cushion covers, consider adding zippers or Velcro fasteners. These closures offer convenience and durability, ensuring that your cushions stay in place even during windy days.
Zippers provide a sleek and seamless look while allowing for easy removal and cleaning of the cushion covers. They also provide a tight seal, preventing moisture or dirt from seeping into the cushions.
On the other hand, Velcro fasteners are a more flexible option that allows for quick and effortless opening and closing of the cushion covers. They provide a snug fit and are perfect for those who prefer a less permanent closure option.
Whether you choose zippers or Velcro, adding a secure closure will enhance the functionality and longevity of your DIY outdoor cushions.
Selecting the Perfect Foam or Padding
- First, assess the level of comfort you desire by selecting the appropriate foam or padding for your DIY outdoor cushions. The foam or padding you choose will determine how soft or firm your cushions will be. If you prefer a plush and luxurious feel, opt for high-density foam with a high ILD (Indentation Load Deflection) rating. This type of foam provides excellent support and durability.
- On the other hand, if you prefer a firmer cushion, consider using medium-density foam with a lower ILD rating. This foam will provide a more supportive feel.
- Another option is to use outdoor polyester batting, which is lightweight and provides a softer feel. Whichever option you choose, make sure it’s suitable for outdoor use and can withstand exposure to the elements.
- Remember, the comfort of your outdoor cushions will greatly enhance your outdoor relaxation experience.
Creating Ties or Fasteners
To securely attach your DIY outdoor cushions, start by creating ties or fasteners using a subordinating conjunction such as ‘Once’.
Once you have finished sewing the cushion cover, you can add ties or fasteners to ensure that the cushion stays in place.
One option is to sew fabric ties onto each corner of the cushion cover. These ties can be made by cutting strips of fabric and folding them in half lengthwise before sewing them onto the corners.
Another option is to use hook-and-loop fasteners, such as Velcro, to secure the cushion to the chair or bench. Simply sew one half of the fastener onto the cushion cover and the other half onto the chair or bench.
This will allow you to easily attach and detach the cushion as needed.
Whichever method you choose, creating ties or fasteners will help keep your DIY outdoor cushions securely in place.
Adding Piping or Trim for a Finished Look
Once you have securely attached your DIY outdoor cushions by creating ties or fasteners, you can enhance their appearance by adding piping or trim for a finished look.
Piping or trim is a decorative element that can add sophistication and style to your cushions. It creates a defined edge and gives your cushions a professional, polished finish.
To add piping or trim, start by choosing a fabric that complements your cushions. Cut strips of fabric on the bias to create piping, or choose pre-made trim for convenience.
Sew the piping or trim along the edges of your cushions, making sure to align it evenly.
This simple addition can elevate the overall look of your outdoor cushions and make them stand out in your outdoor space.
Making Waterproof or Weather-resistant Cushions
To ensure your outdoor cushions can withstand the elements, you need to waterproof or make them weather-resistant.
One way to do this is by using a waterproof fabric for your cushion covers. Look for fabrics that are specifically designed for outdoor use and have a waterproof or water-resistant coating.
Another option is to apply a waterproofing spray or sealant to your cushions. These products create a protective barrier that repels water and prevents it from seeping into the cushion filling. Make sure to follow the manufacturer’s instructions when applying the spray or sealant.
Additionally, consider using quick-drying foam for your cushion filling. This type of foam is designed to resist mold and mildew and dries quickly after being exposed to rain or moisture.
Cleaning and Maintaining Your DIY Outdoor Cushions
To keep your DIY outdoor cushions looking their best, regularly clean and maintain them.
Cleaning your cushions is essential to remove dirt, stains, and mildew that can accumulate over time. Start by brushing off any loose dirt or debris using a soft brush or a vacuum cleaner with a brush attachment.
Next, mix a solution of mild soap and water and gently scrub the cushions with a sponge or soft brush. Rinse thoroughly with clean water and allow them to air dry completely before placing them back on your outdoor furniture.
In addition to regular cleaning, it’s important to maintain your cushions by protecting them from harsh weather conditions. Consider using covers or storing them indoors when not in use to prolong their lifespan.
With proper cleaning and maintenance, your DIY outdoor cushions will continue to provide comfort and style for years to come.
Frequently Asked Questions
How Do I Choose the Right Color and Pattern for My Outdoor Cushion Fabric?
To choose the right color and pattern for your outdoor cushion fabric, consider the overall aesthetic of your outdoor space and your personal style. Opt for colors and patterns that complement your existing decor and create a visually pleasing and inviting atmosphere.
Can I Use Regular Sewing Thread or Do I Need to Use a Specific Type for Outdoor Cushions?
You can use regular sewing thread for outdoor cushions, but it’s recommended to use a specific type for better durability. Outdoor thread is designed to withstand the elements and prevent unraveling.
Is It Possible to Make Outdoor Cushions Without Sewing?
Yes, it’s possible to make outdoor cushions without sewing. You can use fabric glue or iron-on adhesive tape to create no-sew cushions. This method is quick and easy for DIYers.
What Are Some Creative Ways to Add Decorative Elements to My Outdoor Cushions?
To add decorative elements to your outdoor cushions, consider using fabric glue to attach ribbons, buttons, or iron-on patches. You can also try stenciling designs with fabric paint or using fabric markers for a personalized touch.
Are There Any Specific Safety Precautions I Need to Take When Making Outdoor Cushions?
When making outdoor cushions, it’s important to take specific safety precautions. Keep sharp objects away from children, use fire-resistant materials, and ensure proper ventilation when using adhesives or paints.
Conclusion
In conclusion, creating your own DIY outdoor cushions can be a fun and rewarding project. By choosing the right materials, measuring and cutting the fabric, sewing the cushion covers, and adding finishing touches like zippers or trim, you can customize your cushions to fit your style and comfort needs.
With proper care and maintenance, your homemade cushions can provide long-lasting comfort for your outdoor space. So why not give it a try and enjoy the cushioned comfort of your own creation?